Эспрессо-машина De'Longhi ECP3120 15 бар с усовершенствованной системой капучино, 9,6 x 7,2 x 11,9 дюймов, черный/нержавеющая сталь

Brand:De'Longhi

3.3/5

226.47

Пожалуйста, ознакомьтесь с руководством пользователя или руководством пользователя или руководством пользователя (приведенным ниже в формате PDF) перед первым использованием.

Пожалуйста, ознакомьтесь с руководством пользователя или руководством пользователя или руководством пользователя (приведенным ниже в формате PDF) перед первым использованием.
Brand De'Longhi
Capacity 1100 Milliliters
Color Black/Stainless Steel
Product Dimensions 9.6"D x 7.2"W x 11.9"H
Special Feature Removable tank

3.3

8 Review
5 Star
66
4 Star
16
3 Star
6
2 Star
4
1 Star
9

Напишите свой отзыв

Ваш адрес электронной почты не будет опубликован. Все обязательные поля помечены*

Scritto da: Jessielee887
like Americanos and lattes
I have been meaning to write a review on this machine for a long time. I consider myself not just a heavy coffee drinker, but someone who appreciates the many forms you can make it. After a while drinking espresso drinks, like Americanos and lattes, I decided to invest in something for my home because I was spending too much money at coffee shops. Like most normal people, I don't have $500 plus to spend on one but I also was not interested in buying something completely cheap and wasteful for $35 like you will see some of these machines. When I purchased this machine it was about $200, and it looks like the price has dropped since then, but I will say that for someone on a budget, this was a really great purchase that gets you very close to what you would produce from a high-end machine if you learn to use it to practice. It took me a little bit of time to figure out exactly how to get my espresso the way I enjoyed it, but when I finally did I used it every single day for probably more than six months. It does not take very long to prepare when you turn on the machine so the water is hot and ready to go within a minute or two. It does come with a plastic tab and I do recommend getting some accessories to go with it so you get as close to high-quality espresso as possible. Through trial and error you will find how hard to pack the coffee, because if it is too compact you will not be able to run the steam through it as the pressure is not strong enough. It will come out dripping instead of flowing and when it comes out that slow it tends to be extremely bitter and usually ended up down the drain. Eventually you will find the Best way to pack the coffee, how much time to run the machine, and how to properly clean it. If at first you are not enjoying the product you were making I highly recommend continuing to practice until you find what suits your needs. When you turn on the machine after preheating, you flip the switch to make the espresso. It does not have an automatic off switch, meaning you can pull the coffee as long as you want depending on your preference. I discovered that the best way for me to make what I want was by using a particular size cop and when I reached the top of the cup that typically was the strength of espresso I wanted. It is a little difficult to clean, but it does have a function to run water through it to clean it and flush out remaining espresso grounds. I use this every single morning for probably at least six months. I made everything from quad shot Americanos to hot and iced mochas and lattes. The machine comes with two different kinds of cups to insert into the portafilter. I believe one is a 2 cup deep and the other is one cup. I always used the deeper cup so I could make strong espresso. One fun little tidbit about this machine is when you open the lid where the water reservoir is, there is a place to store the cup that you are not using. Removing the water reservoir and feeling it is completely simple. Occasionally if you do not press it into the machine well enough it will not seal and you will not be able to pull the water through, just make note of that when putting the water reservoir back in. One of the biggest pitfalls of this machine is the steam wand. It is very short, you can adjust length of wand to be made either for hot milk or cappuccinos. My big complaint about this is that it is a very small one. I had to buy the tiniest stainless steel frothing pitcher, because the steaming wand was so short you could not even reach the bottom otherwise. This resulted in your steamed milk exploding all over. In addition, there is a rubber seal inside the steaming wand and at some point mine just started to completely shoot off because the steam coming out was stronger than the seal so essentially, the steamy one was useless to me. Additionally, the steaming wand seemed to have trouble producing steam versus shooting out scalding hot water. It seems like you had to run it for quite a while before you would get steam only. This was the only part of the machine that I found to be too cheap to use. It was by no means a dealbreaker for me because I found that heating and frothing milk with a separate appliance was actually better quality milk anyway. If I could purchase a machine just like this and skip the steaming wanted to save money I would much prefer that. Next, is the temp that comes with the product. It is cheap plastic, and serves virtually no purpose. It is very cheap to just buy one here on Amazon. In the six months or so that I can use my machine every single day I never had to do a deep cleaning. However, I packed it up and moved across the country with it and when I attempted to use it one day it came out terrible. I'm hoping that although it was not used for quite a few months that it still has the ability to work by breaking it in again. If it doesn't, I still feel as though I got my moneys worth because of how much I did use it when it was working fine before I moved. Overall, I am extremely satisfied with this machine, keeping in mind that it is on the lower end of price but it produces relatively high quality espresso for being $200. To summarize: -Trial and error at the beginning is the best way to find your preference in strength and taste of espresso. -Part Of trial and error is figuring out how much coffee to put in and how hard to Tamp it. -If you remove the water reservoir to refill, make sure you press it back in very hard or it may not seal and you will not be able to suck up the water. -When pulling a shot, it does not turn off automatically. You need to watch it, and a few seconds before you decide the quantity of espresso is enough, you then turn it off, because it will drip for a few seconds longer. -For consistent espresso I recommend using a cup that you can use as a measuring tool so you know when to turn it off. -In my opinion, the steaming wand is useless, and you are better off getting a separate appliance if you are going to make cappuccinos, lattes, etc. -I did not do regular maintenance on cleaning and things turned out OK, but that could be why it does not work very well now that I have not used it in a few months. I'm eventually going to figure out if the espresso machine is completely useless after being retired or if there is a way to break it back in. -It can stand up to every day use, for how long I'm not sure, but for me it was 6+ months. -When you attach the Portafilter, take note that it has gone in correctly or it wilL not thread appropriately and it will make a huge mess, dripping out the sides. -When you thread the Portafilter on to the machine, eventually the handle can become loose from all the tightening and loosening. If the handle were to break I'm sure there are replacements that are easy to get. -It is relatively compact and I was very impressed with how little space it did take up on the counter. -If you want to do this "right" you will probably want to purchase other appliances to have the best experience possible. -If after months without use it no longer is functional, I will probably replace it with a second one similar or identical to this, because as far as I am concerned, I used it very heavily for a long time, which is worth $200. As many people will say, it does not make sense to buy a machine like this without investing in the accessories that really allow you to enjoy your espresso the way you should be able to. I'll put the recommended accessories below here: -Metal tamp (cheap on Amazon) -Small cup for your espresso. I like using one that is about the size of a small tea cup that you would use with sake or jasmine tea because it is the perfect size to gauge when I am finished making my shot. -Burr Grinder (I have Baratza Virtuoso for $229). This is obviously not necessary, but there is a reason why it is so expensive. It makes incredible ground coffee to your liking that you can adjust from extremely fine for espresso to extremely course for
Scritto da: Peter Oliveira
For the Price? Probably one of the best in the market.
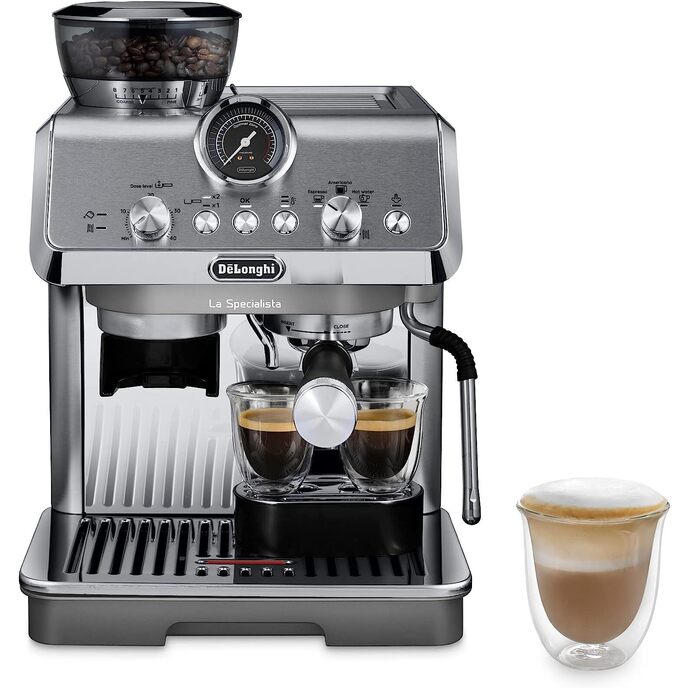
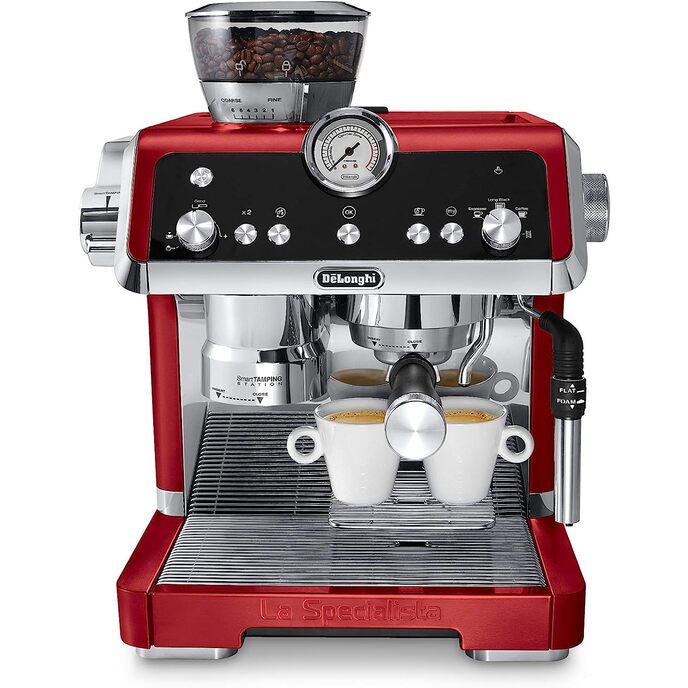
I am a college student who works as a barista and absolutely loves coffee and espresso. When I first saw this machine at Target, it immediately caught my eye. If you are in a tough financial situation like many college students are, or if you are looking for a beginner machine that won't cost an arm and a leg, this would definitely be the one. Although this doesn't have a barometer, for the price point you can't really complain, especially since it has a pretty good steam wand. First, I'll get the leaking issue out of the way. The original unit I received did have the same issue many other reviewer's did in that it was just leaking a ton of water on my counter. Once I did a return and exchanged it for a same unit though, I noticed the issue was gone. I'm not sure what kind of quality control issues Delonghi is having, but I hope they get it fixed as soon as possible. Next, I'll get the cons out of the way. Since this doesn't have a barometer, you have to kinda just put your trust in the machine and simply taste and experiment as you go until you find the proper grind consistency for a good, layered, shot. Once you find it though, you'll be happy you did, as shown in the photo above. Second, since this is a manual machine, you'll have to either use a scale(another reason to buy one) or some other form of measurement to measure your shots for consistency. There is a 2 pack of espresso-measuring shot glasses on amazon that sells for only $12 that I would highly recommend for this: https://www.amazon.com/dp/B08NWGC82N/ref=cm_sw_em_r_mt_dp_QWM2KQN1W5HKTG4977CG The scoop/tamper this thing comes with is garbage. I hate to say it but since it is plastic and has a weird lip-type thing near the base, it is difficult and actually somewhat painful to hold it in such a way that you can comfortably tamp your espresso. Also, lets be honest. If you are brewing espresso, it's kinda common knowledge that the best results are gonna be from measuring your beans by weight. Not volume. Just get a kitchen scale if you don't have one already. My kitchen scale is easily one of my most useful kitchen tools, and if you use it properly, it'll probably be the same for you too. The portafilter is a pain in the butt to put on. IDK how Delonghi designed this thing, but in my experience, this portafilter always requires the strength of Hercules to put on straight, even when it's empty. IDK how this got overlooked, but because of that, even with all my force, I usually end up with the portafilter at a slight angle before I brew. Final issue: The steam wand. The steam wand is very powerful and is amazing at steaming milk, however the issue I had with it is the control. The steam wand will do 2 things: shoot out steam for steaming milk, or simply shoot out hot water for americanos. Differentiating it between these 2 actions is definitely not an easy task at first, and it is definitely more confusing than it needs to be IMO. If you are having trouble with it, here's how it works. Turn the dial in front of the machine all the way left to steam milk (wait for ON light to turn on), if the dial is in the ON position, the wand will do a weird thing were it keeps going back and forth between steam and hot water, and then finally turn the dial all the way right for hot water. Once your dial is in the proper position, turn the dial on the side of the machine all the way down to activate the steam wand. Design team definitely could've made the steam wand easier to use. If you are considering this machine, I would highly recommend it. If this is your first espresso machine, keep in mind there are a few extra items you'll need if you wanna use this thing to it's fullest potential. Kitchen scale. If you don't already have one for other kitchen applications, brewing good espresso is gonna come from consistency above all else. Measuring your beans by weight is already a massive step towards upping your espresso game. You should also be measuring your final product by weight, but you can also measure your shots with the glasses I posted above. Tamper. You can find the Delonghi one on Amazon for about $20, and once I bought this, I immediately noticed a HUGE difference in the quality of my shots. Since you are supposed to tamp your espresso with approximately 30 lbs of pressure, the only way to comfortably and accurately do this is with an actual tamper. The tamper Delonghi sells on amazon is the perfect size for this and fits like it was designed by NASA or something. Grinder. Obviously brewing fresh is going to be a huge improvement to any coffee game in general. Don't cheap out on your grinder. If you want to be as cheap as possible, you can go for a manual burr grinder and just grind your beans by hand. This will also be best for keeping the noise level down. I don't personally have too much experience with manual grinders, but just look for ones with many good reviews (see if you can find reviews of verified professionals) that mention espresso and grind consistency. If you do have the extra cash, I recommend an electric burr grinder. Never use blade grinders, as they provide no way to give consistent grinds. Probably the cheapest electric burr grinder you'll be able to find that gives good espresso is the OXO one. I believe it sells for approximately $110. This is the grinder I personally use and while there are better ones on the market, you won't be able to find any at the same price point. Steaming pitcher. Believe it or not, you will need one of these if you want to do things properly. You can find some pretty cheap ones on amazon at around $10. You'll want a steaming pitcher for 2 reasons. 1, for easier and more accurate milk measuring as well as pouring your milk for latte art if that interests you. 2, and the more important reason is this: Milk burns at 170F and breaks at 158F. Because of this, you need to be able to quickly gauge your milk's temperature so that you know when to stop steaming. Using a glass measuring cup may look ideal, but it will take so long for the heat to transfer to the outside of the cup that you may have already broke or burnt your milk by the time the outside of the cup feels hot. This is why steaming pitchers are so thin and are metal. Faster heat transfer means more accurate gauging of temp so you know when to stop steaming your milk. While it will take you some practice, with the proper tools and technique, this is in my opinion, probably one of the best espresso machines to start with or for anybody if you are confined by size or price.
Scritto da: J. D. Mason
Works great - very happy with it.
To begin, I have no idea why Amazon asked me about the "blending power" of this espresso maker. I gave it a 5 anyway as I am very happy with the machine and did not want an odd question to hurt its reputation. It's very easy to operate and it looks great. It heats up quickly, it can pull one or two shots, and comes with three baskets - a single and a double pressurized basket, and then a pressurized basket for a pre-measured pod. It holds a lot of water, and the drip tray is a good size - not too big and not too small. The metal top of the drip tray is heavy chrome - very solid and well made. I only have one complaint - the filter basket on the portafilter fits in with a tension spring. The basket doesn't have slots or bumps or anything to hold the spring so it can pop out rather easily. This is only a concern when you are knocking out the puck after brewing. My previous machine had a lever that you could pull out to hold the filter basket in place when you knocked - I thought that was a better solution than these springs. Good thing I still have it... On the whole, I think this machine is a good-enough machine for a basic user. You can spend thousands more if you want, and have a much fancier machine that you can be very proud to show-off, but I have my doubts whether you can really tell the difference. But - it's your money.
Scritto da: Russana1966
Perfect Machine
Excellent Machine. Easy to use, and makes a perfect expresso!
Scritto da: Vaibhav
Excellent machine if it fits ur budget
I am just intrigued by the fact that the cost has gone up by almost about 15k in a week since i bought it..... Since it an import from US .... Works on 110v therefore a step down converter from 220v to 110v and 1. 5 kv will be required.... As the machine is 1100W....The results quite gud as im only using 100% arabica coffee.....
Scritto da: Hart
Great coffee but beware the clean-up and don't tamp the grounds as firmly as you might with other machines
While the Delonghi Stainless Steel 15 Bar Pump Espresso and Cappuccino maker is a nice looking machine and makes a great coffee it also has some faults. My apologies up front for the extended review, I wanted to make sure you received enough information to make an informed decision by providing more than just the specs or what's included in the box. This machine looks good with its primarily stainless steel exterior, over all fit and finish is well done. For functionality, the controls are laid out in a way that makes using it simple and don't detract from the look. We followed the suggested routine for set up and found that we did get particles coming out the machine for the first three or four minutes. Yes, we always let cleaning processes run longer than suggested. The front facing top panel holds the main control knob plus the power on and ready indicator lights. The lights offer simplistic information. The red light indicates the machine is turned on and the green light lets you know when the machine has reached the required temperature for making coffee. The control knob has four settings. Straight up is off, move one step to the left for turning the machine on to use the milk steamer, if turned instead one step to the right you are switching the main machine on which allows it to bring the water temperature up, the second step to the right is for then making coffee when the light goes green. While in this last position, if you want/need to stop the machine, the cup is full or whatever the circumstance may be, turn the dial back to the on or off position. Right above the front panel, making up the front half of the top is a warming tray. This is to be used for pre-warming cups. You should know this is not an active warming tray, it works in a passive mode using heat that comes from the water heater, there is no way to pre-warm the cups without first starting the whole machine. Because of its design it doesn't get very warm and we found that you need to make at least three cups before it's even worth using. To make this worthwhile a dedicated heating element needs to be added. You're better off pre-heating you're cups with hot water or in a microwave with water. In addition to the front control knob, there is a steamer dial on the top left hand side of the machine. Turned to the left and up it switches off the steamer, down and to the right and you can now dispense hot water or foam milk. The milk foamer works although we were unable to tell any difference between the foam it produced for Hot Milk or Cappuccino settings. The density of foam was always the same. Cleaning the foamer has been made simple. By simply rotating it and pulling down, the exterior portion comes off and can be washed up in a sink. The inside silicon tube can also be removed for cleaning and clearing the hole in the bottom. We do this in addition to running the cleaning cycle suggested in the manual. The foamer arm swings out nicely to the right of the machine for use and then back again underneath for storage. As marked on the sleeve, slide it up for Hot Milk or down for Cappuccino. The water tank is easy to remove and holds a fair volume, 37 ounces. Its accessed by opening the top back half lid. It can be filled while in the machine or pulled straight up and removed for filling. If you're filling while it's still in the machine, any water that misses the tank, or any condensation, will drain down and be collected at the bottom front of the machine. If you have the first tier tray in place the water collects within the tray which is easily removed and emptied. On the inside of the lid are two holders for the additional filters when not being used. This is a nice touch as it keeps everything together rather than needing to find someplace to store the filters. One quick note on the first tier tray, the one you see in the images where two shot cups are being filled. There is a little float under the stainless grill. Its red in colour and if enough coffee or water collects in the tray the float will rise so that its square top shows above the grill. This is a nice touch for letting you know that tray needs to be emptied. The filter holder is a very tight fit in the machine. I find that I need to strong arm the machine while locking the filter holder in place. If I didn't get my arm wrapped around the machine, there's no possible way to get the filter fully locked. Because it should be locked in I would like to see some form of a grip or handle that would facilitate locking the holder in place without looking like a WWF wrestler bringing down an opponent. The holder itself has a secure grip on the filters when inserted but they are also very difficult to remove for cleaning or changing. We found that a knife was needed to get under the edge of the filter so it could be pried up. Not the safest or easiest thing to be doing. Inserting the filters results in them snapping into place, no slack here. While the exterior is stainless steel making general clean up easy we found cleaning was required a lot. As coffee comes out of the spouts there are droplets which inevitably results in coffee splatter all over the front of the machine and trays. I can live with this as part of making coffee but the problem is that cleaning up around the tray area is difficult. With the first tier tray in place (making shots) coffee droplets run down between the back of the tray on the front of the machine. Here, once you remove the tray there are a number of corners where it's hard to get at for cleaning. By the way, heads up, there is a very shallow stainless tray (inner drip tray) that sits in the bottom of the second tier that will catch a few drops from making coffee but if any water from the reservoir area leaks it will flood this shallow tray and end up on your counter. You would use this tray with cups up to 5 inches in height. Best to remove the tank for filling. The three included filters are for 1-cup, 2-cups, or for holding ESE coffee pods. This last option is a nice touch as we already had these pods for a different coffee maker and are a very common item. The two cup filter holds enough coffee for two espresso shots and as you can see in the images the two dispensing spouts make it easy pulling two shots at once. An important item to note, there is no auto shut off. The machine will continue to push water till the tank is empty. This is not something we were expecting. An intriguing and annoying item, several times we discovered that while making coffee the green 'Ready' light would go off. This might be expected if there had been a good volume of water that was used for a large cup but not with making shots. It's an intermittent thing so I can't think of an explanation for it. How good does the coffee taste? Depending on which grind you prefer. We discovered that we needed to do some testing to find the right amount to tap into the filters. One word of caution here, tap lightly. Our first few brews we tapped as hard as we would on an older machine and were perplexed, why were there only a few drops trickling out? When we pulled the filters out we discovered that the grounds had a consistency closer to semi dry concrete than was expected. We eased back on the tapping and now have no complaint in that department. After sitting for a few days the machine had difficulty self-priming and needed a good 5 minutes to run a priming sequence before it dispensed any water. It was up to temperature, as indicated by the ready light, there was just some sort of an air lock which means it could be designed better in this area. After all that, it's easy enough to make a cup or two of great tasting coffee. Clean up is what takes too long with this machine. So over all it can make a fine coffee even though there are some short comings. Would I recommend it? Good question, I would need to bring up the above items so that the individual knew what to expect.
Scritto da: john w carothers
Goodness
Works
Scritto da: K. Koerfgen
Very Good Espresso Machine in This Price Class
At home we have been making high-end espresso machines for years and in the office I used a similar De’Longhi espresso machine, so I bought this one for my daughter. I was looking for a machine that can also use ground coffee and ESE (paper) coffee pads that are easier on the environment than the Nespresso aluminium capsules and have less cleaning needs than ground coffee. The machine looks solid, is easy to use, produces an excellent espresso and the steam wand works very well and makes it easy to make a decent latte or cappuccino. This turned out a very capable, yet not overly expensive espresso machine.

Сопутствующие товары

Откройте для себя нашу международную сеть

Мы отправляем в 28 стран, более 200 000 товаров. Будьте в курсе, подпишитесь на рассылку.

Array